
TinkerCad: The Circuit Design Software for Arduino Projects
Wouldn’t it be nice if you could design circuits with a software? You can. With TinkerCAD, you can easily create a virtual circuit model before making it in real life. TinkerCAD is an online CAD (computer-aided design) software with which you can create all kinds of designs, including electronics projects for Arduino boards. It’s also an Arduino editor, allowing you to create your projects without any knowledge about programming or electronics because the application itself has predefined blocks that represent electronic components like switches, resistors, LEDs, and many more. You just drag and drop the parts onto your board and connect them.
What Exactly is TinkerCAD?
TinkerCAD is a free online CAD program created primarily to help designers and engineers create 3D models of their designs. It has simple yet powerful tools that allow anyone, regardless of experience level, to design anything from real-world objects like toys and games to art pieces or architectural designs. The website also offers free YouTube tutorials for those new to the world of 3D modeling and electric circuits.
TinkerCAD is an easy way for people with all skill levels to design 3D without spending money on software or equipment. It’s also fun because you can see your work come alive instantly as you build it. Created in 2011, it’s now one of the best tools for hobbyists, students, and engineers to develop simple circuit boards. The software has a nice graphic interface, so you can create your own projects without being an expert in electronics.
When creating a new board, you can use different colors, so it’s possible to make boards with different layers of components. The software is very intuitive and easy to learn, even if you’ve never used CAD before in your life. Below are three significant benefits of using TinkerCAD:
It’s free and easy to use
As briefly mentioned above, TinkerCAD is a free web application that can be accessed from any computer with an internet connection and a browser. You don’t have to go through a long process of installation or setup. Furthermore, it’s not necessary to have any knowledge of other CAD software to use TinkerCAD. You just need to know how to use a computer mouse and be familiar with its basic functions, like dragging objects from one place to another, selecting them by clicking on them once, zooming in/out, and rotating them.
2) TinkerCAD has a great community
TinkerCAD has a very active community of users who share their projects, ideas, and knowledge. Many experienced engineers post tutorials about using the software for different purposes, like creating Arduino projects by designing the circuit board or building a robot. TinkerCAD also has its own code repository where users can share their open-source designs. You can use their official forum for questions, suggestions or just chat with other people using the software. There are also countless libraries of ready-to-use parts and projects that you can download.
3) Makes Prototyping Easier
One of the advantages that TinkerCAD provides is making prototype creation easier. It’s a lot faster and cleaner to prototype with TinkerCAD than on actual electronic boards because there are no wires, saving time and money in the long run. Also, if you make a mistake while designing or importing a project from a file, the software will warn you immediately.
How to Use TinkerCAD
In this section, we will show you how to use TinkerCad and create a basic blinkering LED circuit using the software.
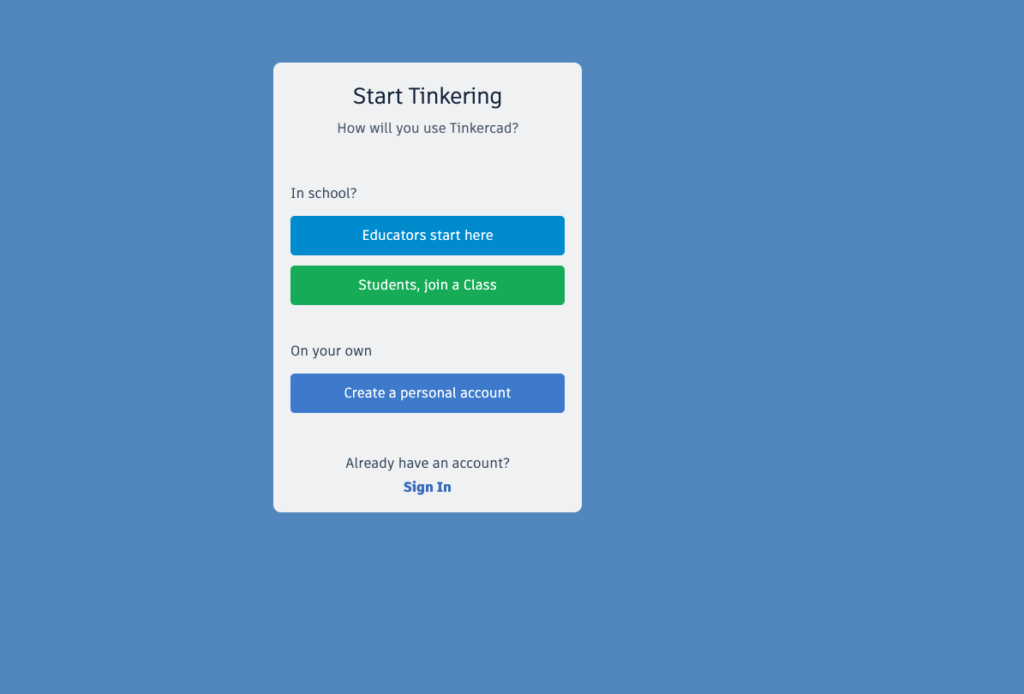
To use TinkerCad, the first thing you need to do is create a free account. You can do so by visiting TinkerCad’s website. On the top ride side of the website, click Join Now. Then, a new window will open, showing different options for students, educators, and hobbyists. If you are a hobbyist, just click “Create a personal account” and sign in with your Gmail account.
After signing in, you will need to click “Circuits” on the left side of the dashboard. Then click on “create a new circuit” and start playing around with the different components. For example, to create a blinkering led, just go to the components section on the right side of the screen and import an Arduino Uno with a breadboard. You can see the power connections between the Arduino circuit and the breadboard have already been made for you. These can be disconnected and reconnected by simply clicking on the connection.
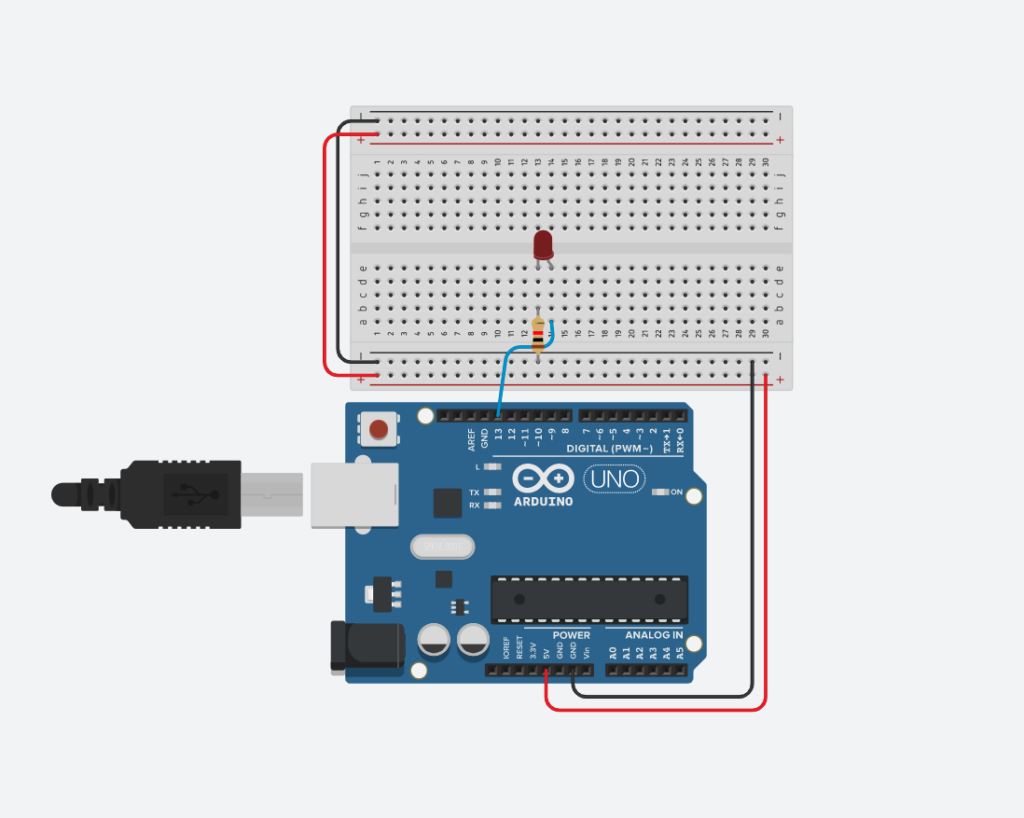
You can use multiple colors for the links to make it simpler to tell the difference between various input, output, and power connections.
To connect components, you can drag them across to your board, and TinkerCad will automatically make all necessary connections for you. In this case, we need to bring an LED and a resistor to the breadboard. Connect the LED’s longer leg, also called the anode, to pin 13 on the virtual Arduino and connect the resistor to ground. Then, just click on “Start Simulation” at the top right of the screen and make sure your LED blinks.
You can also check and edit the code that has been automatically generated for you by clicking “Code” next to the Start Stimulation button. TinkerCad saves your application and everything you create in the cloud, so there is no need to worry about losing your work. Once you’re done with designing your board, you can save or download it. You can also share the link with other users for them to view and edit your project.
In brief, the circuit design software for Arduino projects TinkerCad is a free, intuitive, and easy-to-learn application. With this tool, you can easily create your electronic circuits without knowledge of other CAD software or electronics engineering. If you are looking for an easier way to prototype your project, then it’s time to start tinkerin